Build a Nutrient Tank
In every Hydroponic system there must be some sort of holding area for the Hydroponic nutrient solution that feeds the plants. We have seen how to build the first half of the Hydroponic system where the plants are to be grown. Now let's look at the real heart of the Hydroponic system which is the nutrient tank. The nutrient tank can be any size or shape container that is sturdy and waterproof. It should be easy to clean and should be the appropriate size for the plant growing area that is to be supplied with the Hydroponic nutrients. The larger the growing container, the larger the nutrient tank. This is important because the Hydroponic nutrient tank must not empty itself before the growing container is full. Better yet, the Hydroponic nutrient tank should be larger in water volume than the Hydroponic growing container because water will evaporate on a daily basis depleting the water level in the tank. Not only that, the more water volume in the nutrient tank helps with the buffering action of the Hydroponic nutrient solution so that the PH does not drift radically.
So basically if your Hydroponic growing container holds 3 gallons of water your Hydroponic nutrient tank should hold about twice that or 6 gallons or more. Do not misunderstand something - it will all work just fine if you only have 4 gallons in your nutrient tank. You will just have to work harder refilling the nutrient tank and adjusting the PH more often. In the case of the Hydroponic nutrient tank more is definitely better. Make it easy on yourself if you can. Remember - easier is good. Having said all of that choose an appropriate Hydroponic nutrient tank for your Hydroponic growing container.
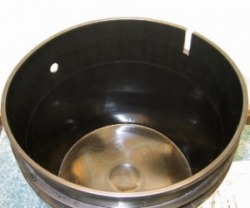
For an example we have chosen a 3 1/2 gallon black plastic bucket for a very small Hydroponic system. Black equals no algae growth. Again, any size container can be used. We have used 100 gallon tanks for this and it works great. We cut a small slot on one side to accept the water pump electrical cord and the air hose from the air pump. On the other side a 5/8" drilled hole exactly like we did in our growing container. This hole is for the same 13mm rubber grommet we used as well. Both the hole and the cut-out slot can be placed anywhere that you like depending on your design location of the pumps.
Build a Nutrient Tank - Step 1
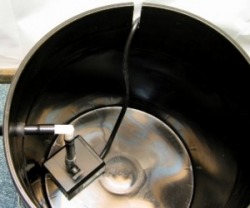
Decide on the final location of your Hydroponic nutrient tank. It should be located below your growing container and be accessible for filling and stirring of the nutrient solution. Re-cut your pump supply hose to the final length making sure there are no kinks in the hose This shows the water pump properly installed into the Hydroponic nutrient tank and the 13mm rubber grommet and 1/2" black vinyl hose inserted into the 5/8" hole we drilled into the side of the nutrient tank. We located the drilled hole for this as high as possible so as not to interfere with the closing of the bucket lid. We feel better with all water fittings above the water line whenever it is possible. There is less to worry about this way as far as any possible leakage.
We installed the rubber grommet with the large flat side outside the nutrient tank for easier removal of the hose later on. We used a 3/8"x3/8" WATTS PL-350 NYLON HOSE BARB ELBOW to connect the top hose to the shorter lower hose that connects to the water pump. This is the same elbow fitting we used on the fill hose in our growing container earlier. You could eliminate this nylon elbow if you like by locating the pump in another area of the Hydroponic nutrient tank so as not to kink the supply hose. We like doing it this way with the nylon elbow because it is nice and neat and keeps the pump off to the side of the tank out of the way for stirring the nutrient solution.
Build a Nutrient Tank - Step 2
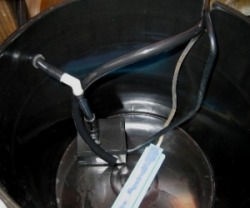
Now you can take your other hose you installed on the growing container which is the lower overflow hose and re-cut it to the final length after positioning it into the cut-out slot and into the Hydroponic nutrient tank. Cut the hose so it reaches the bottom of the tank. If you do this correctly and your pump flow is not too high you will get an added bonus from this return overflow hose. If the water level is correct in the growing container the hose will also suck in air putting a good amount of air into your Hydroponic nutrient solution, enriching it with oxygen for better plant growth. It will make gurgling sounds in the Hydroponic tank when it is working correctly. We have added an air stone in this nutrient tank for an even higher level of oxygenated nutrient solution which really improves the plant growth. There are many air stone types available and some much larger than this one for larger Hydroponic systems. The hose for the air stone is shown inserted into the slot underneath the 1/2" overflow hose. We have used a very small water pump in this small Hydroponic nutrient tank.
The air pump we used with this Hydroponic system is an 2800CC per minute double outlet air pump. This is a fairly decent little pump for the price and can be found in the pet department. It is rated for 20 to 60 gallons fish tanks and does a great job introducing oxygen into the nutrient solution. I would not get any air pump smaller than this for any Hydroponic application as they just do not put out enough air flow to the nutrient solution. In fact an even larger pump would be good. Both these small pumps are plugged into and controlled by a timer which can be set to any number of flood times depending on what growing medium you will be using and what you are growing.
Build a Nutrient Tank - Step 3
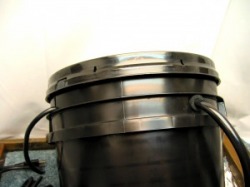
This is the finished Hydroponic nutrient tank with the lid on. Keeping the lid on helps slow down evaporation and keeps dust and debris out of the Hydroponic nutrient tank. Note the rubber grommet which holds the supply hose tightly in place and the pump electrical cord in the cutout slot on the other side. The lid goes on the tank and does not interfere with any of the hoses and cords. The Hydroponic nutrient tank is filled to the level just below the rubber grommet and with using this design there is absolutely no way anything can ever leak because everything is above the water line. A worry free, simple to build Hydroponic nutrient tank that works great. A larger 10 or 20 gallon or more plastic tote or 55 gallon drum could have been used here as the basic principles are the same no matter what size tank you are building.
Any type of Hydroponic system can be designed using the basic principles used here. An NFT Hydroponic system just has a modified growing area, usually a flat bottomed channel with the nutrient solution constantly flowing in the channel. A Top Feed Hydroponic system also just has a modified growing area using drip hoses to each plant instead of flooding the whole container. An Aeroponic Hydroponic system uses another modified growing area, usually being an enclosure with sprayers inside instead of the flooding method. A Bubbler Bucket is almost what you see here but with a cut-out in the top of the bucket lid with a potted plant in it and the bubbles from the air stone feed the plant roots. All Hydroponic systems are basically based on the principles you see here with just a few modifications of how the nutrient solution is applied to the plants.
